Googles recent & lately increasing emphasize over website speed make it an important factor when it comes to organic rankings. As per google own announcement in 2010 regarding website speed as a ranking factor, websites that are fast will get better ranking in Google SERPS. The recent initiative of Accelerated Mobile Pages (AMP) has just reaffirmed Google’s stance over website speed.
According to BuiltWith.com, a website that tells you the technology behind a website, almost 38% of websites built with CMS(content management system) uses WordPress. From personnel blogs to high traffic websites like CNN.com are built using WordPress CMS. The main factor behind the success of WordPress is its user-friendly UX and UI, availability of thousands of plugins and themes. There is a 90% chance that whatever requirements you have for your website, there will be already a plugin for that. Since WordPress is the most common CMS, therefore we have outlined a complete step by step guide to speed up your word press.
We are using GTmetrix.com for speed results. You may also check your website with Pingdom Pagespeed tool and webpagetest tool.
To make things interesting, we have implemented all the settings on this very website and recorded its speed after each change. The following is the initial speed ratings for haseebnajam.com.

1. Install And Setup WTC Total Cache
W3 Total Cache is one of the most popular cache plugins of WordPress. It gives the user better control over the website cache functionality and speed optimization. Install the W3 Total Cache and implement the following settings.
Go to your WordPress dashboard and then go to Plugins > Add New > Search W3 Total Cache. Install the plugin and activate it.
NOTE: Before doing any change, under General Setting Options, ENABLE the preview mode. In case some of the cache settings break your website, you can simply revert the change before actually implementing it on the website. Preview your website after each setting and once you are done and everything seems fine, DEPLOY the settings and then DISABLE the preview mode.

Under the Performance Tab in the left menu bar of WordPress dashboard, Go in General Setting option and enable the following options.
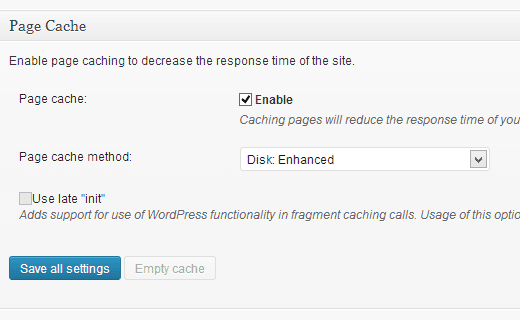
Enable the Page cache. If you are on shared hosting use Shared Server Disk: Enhanced in Page cache method.

Similarly, Enable Minify. Select Minify mode to Manual & select Shared Server: Disk Enhanced in Minify cache method option.
Enable Database & object Cache as well with the same Shared Server: Disk Enhanced option.
Enable Browser Cache and Save All Settings.
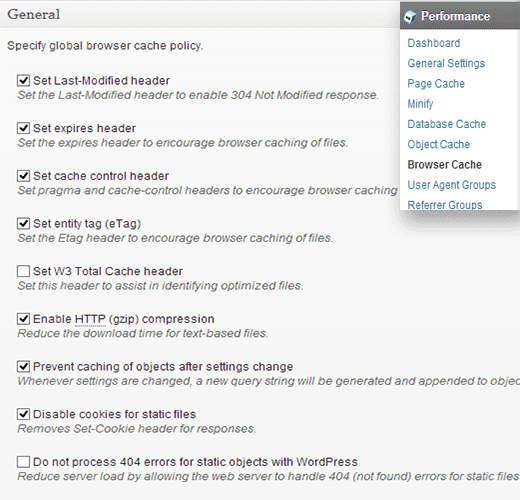
Now go to Browser Cache Setting under Performance Tab in the left sidebar of WordPress dashboard, and check the following options.
Set Last-Modified header
Set expires header
Set cache control header
Set entity tag (eTag)
Enable HTTP (gzip) compression
Enable Prevent Caching of Objects after setting changes
Check Disable cookies for static files

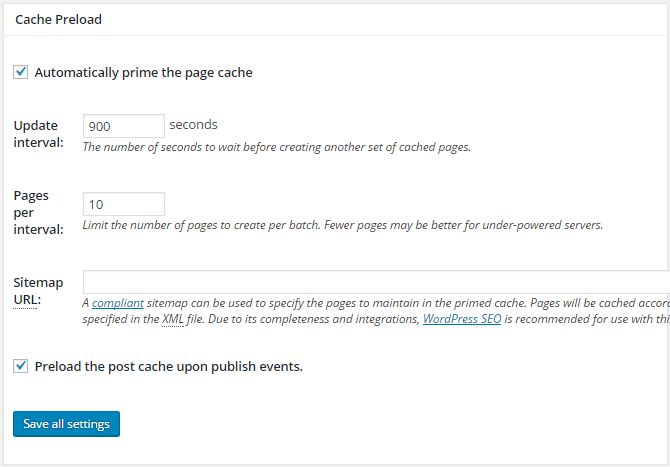
and then save all settings under Cache Preload settings, Enable the PreLoad Cache option with the following settings.

Here is the result after W3 Total cache plugin settings.
2. Optimize Images For WordPress By Compressing Images
Most of the time we prefer to use high-quality images for our websites which means larger image size thus increase the load time for the webpage. Its always a best practice to compress images or use smaller size images. If you use Photoshop, you can change the size of the image by changing Quality of Image. However it may result in reduce quality. Another manual but great option is to use the website http://compressor.io/
I personally use this site all the time. The best thing about it is the quality of the image remains the same even after compression.
- Install Cloudflare DNS
Cloudflare DNS service works sorta like CDN service. When you add your website hosting service DNS (ns.domain.com) to your domain name, every time someone visits your website, be it bots or humans, the browser looks up for the DNS address that you have added and every request will be forwarded to the same hosting. With Cloudflare DNS service, when a browser requests the DNS, your DNS will be available from the nearest location of the user, which speeds up the website retrieval process. At the same time, Cloudflare also caches the website and in case your website is down, visitors can still see the cached version of your website which is better than a 404 error in any case. You can add basic Cloudflare DNS service on 1 website for FREE.
Go here to Signup for Cloudflare.
4. Enable Keep Alive
You might have seen many movies where a person was talking on wireless and for each conversation, he has to press a button and then said OVER at the end of the conversation. Now consider your regular conversation on mobile phones. Once the call is connected, you don’t have to activate or enable your phone whenever you want to talk.
Keep-Alive works in the same way. It keeps the same TCP connection (Transmission Control Protocol) open for every request a browser sends to a server for a file. So it doesn’t have to open a connection for each request every time and then close it after it is completed. You can enable keep-alive by adding the following code at the end of your .htaccess file
## ENABLE KEEP ALIVE ##
<ifModule mod_headers.c>
Header set Connection keep-alive
</ifModule>
5. Remove query strings from static resources
If you go to source code (use CTRL+ U) of a website, you can see lots of URLs like this in the head section of the website.
http://domain.com/wp-content/plugins/js_composer/assets/css/js_composer.css?ver=4.7.4
The problem with query string URLs (?ver=) is they won’t be cached by cache plugin. So you have to remove the last part of the URL and turn it into the following to make it cache-able.
http://domain.com/wp-content/plugins/js_composer/assets/css/js_composer.css
Although there are chances that you don’t have to manually do it, however, if GTmetrix shows the error, you can use the following code in your WordPress theme FUNCTIONS.PHP file to remove the version from the URLs like CSS and javascript
Just add the code at the end of the functions.php file, just before ?>
/*** Remove Query String from Static Resources ***/
function remove_cssjs_ver( $src ) {
if( strpos( $src, ?ver= ) )
$src = remove_query_arg( ver, $src );
return $src;
}
add_filter( style_loader_src, remove_cssjs_ver, 10, 2 );
add_filter( script_loader_src, remove_cssjs_ver, 10, 2 );
Note: this code may break your website CSS so please use it very carefully and before implementing on live site, please use it on demo or test website.
Besides these 5 steps, you may also use CDN for WordPress.
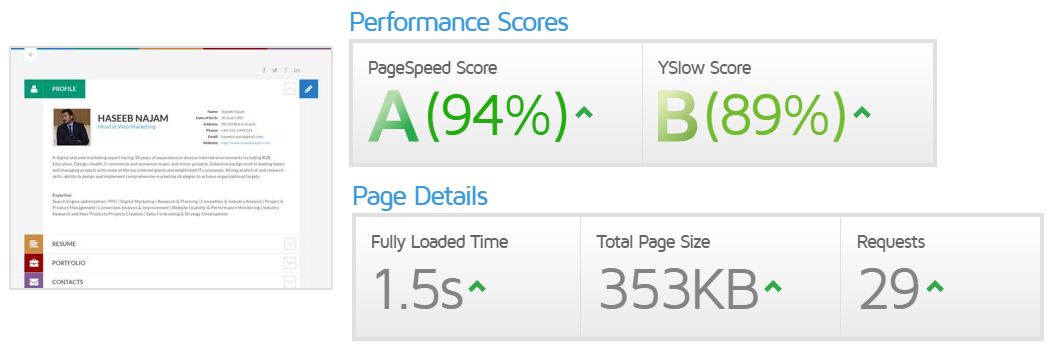
So after implementing everything following is the final score for the website so far.

Pretty good ain’t it? Now we can improve it by specifying the image dimension however it may cause responsiveness issue so we keep it that way. Now that you know how to make your WordPress website freaking fast, its time to get to work. We wish you Godspeed!


